Renko chart basics are surprisingly simple once you understand how the bricks form. Renko charts slice through market noise by plotting price movement in fixed-size “bricks,” letting you spot trends faster and stay in winning positions longer. If you’ve ever felt overwhelmed by candlestick wicks, inconsistent bar sizes, or whipsaws, this beginner-friendly guide to Renko chart basics will show you why Renko might be your new secret weapon.
If you want the full learning path from setup to strategy development, see my complete Renko charts guide, where I organize brick size selection, entries, exits, and backtesting into one structured workflow.
One of the most common beginner questions is where Renko works best. If you are comparing stocks, forex, and crypto, see my breakdown of the best markets for Renko charts.
Table of Contents
🎁 Free Renko Quick-Start PDF
Print-ready cheat sheet with brick-size formulas, TradingView setup steps, and a trade checklist.
1. What Is a Renko Chart?
A Renko chart (the name comes from renga, the Japanese word for “brick”) ignores time altogether. Instead, it draws a new brick of fixed height whenever price moves far enough in either direction. Each brick is usually colored green (or white) for upward moves and red (or black) for downward moves. Because Renko hides small, back-and-forth price changes, trends appear as clean staircases instead of jagged zigzags.
If you want a plain-English definition with background context, Investopedia’s Renko chart overview is a solid reference.
Here’s the core logic:
- Choose a brick size—e.g., $1, 10 pips, or 1× ATR.
- If price closes ≥ brick size above the previous brick’s close, plot a new green brick.
- If price closes ≥ brick size below the previous brick’s close, plot a new red brick.
- Time is irrelevant: one brick could form in a minute during high volatility or over several hours in a quiet session.
Result: clearer up trends, down trends, and reversals you can trade with confidence. No more guessing whether that long upper wick matters. If you want to see how these moves turn into actual entries and exits, review the examples in Renko Chart Buy and Sell Signals.
2. Renko vs. Candlestick Charts – Pros & Cons
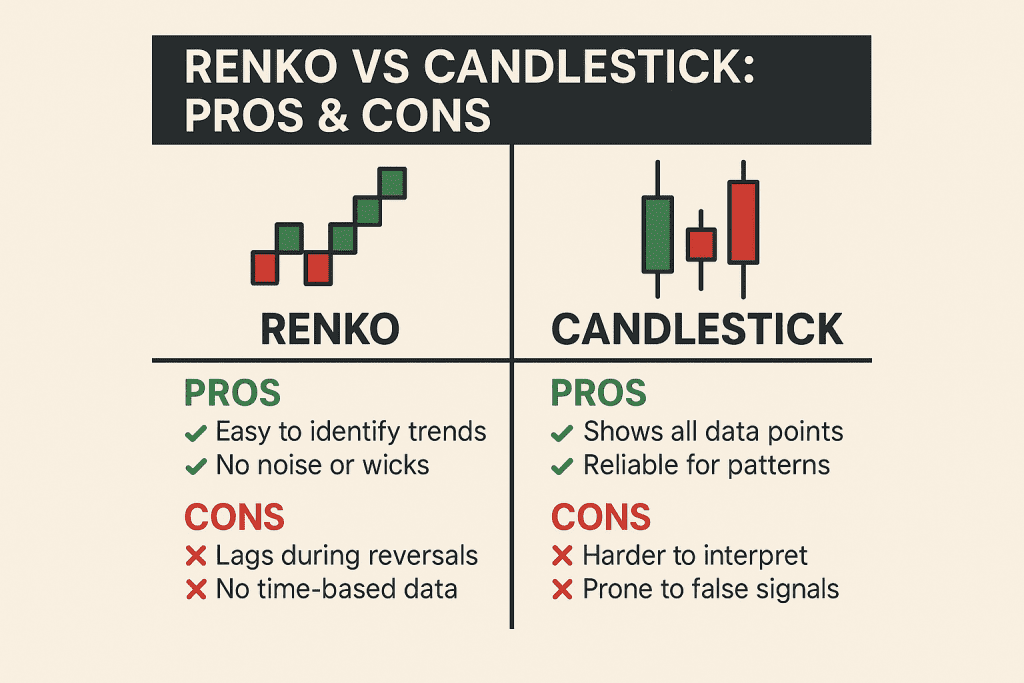
Renko is not a silver bullet, but understanding how it differs from standard candles helps you decide when to use it. Once you understand the strengths of each view, you can choose the best chart type for different Renko day trading strategies or longer term swing setups.
| Renko Charts | Candlestick Charts |
|---|---|
| Filters noise; each brick equals meaningful price movement. | Plots every time period—even dull ones—so sideways markets look messy. |
| Clearer support & resistance lines; tops and bottoms align neatly. | Wicks distort levels (esp. intraday). |
| No time axis → forces you to focus on price action. | Includes time but also distractions (news candles, lunchtime chop). |
| Late entries on sudden breakouts (needs brick confirmation). | Faster signal on breakouts, but more false moves. |
| Great for trend-following & swing trading. | Preferred for scalping news bars or volume analysis. |
Key takeaway: Switch to Renko when you need a crystal-clear trend view or want to remove emotional whipsaws. Keep candlesticks for high-frequency tactics that rely on intra-bar information such as volume, wicks, or specific open and close times.
3. Choosing the Right Brick Size

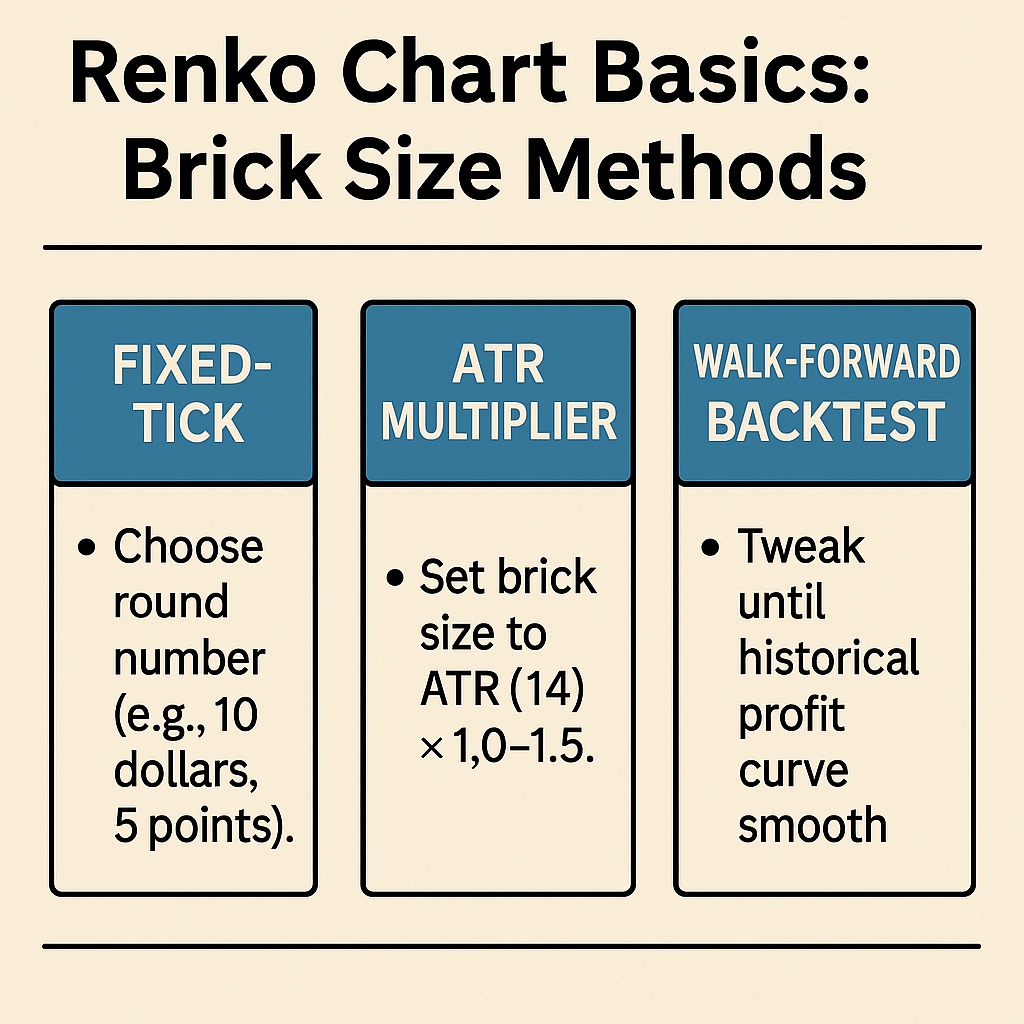
Your brick size is the single most important parameter in Renko trading. Too small and you will relive the whipsaw nightmare; too large and signals arrive late. Below are three proven methods:
3.1 Fixed-Tick (Manual)
Pick a round number (e.g., 10 pips on EURUSD, $1 on AAPL). This keeps charts visually consistent and is popular for backtesting because of its simplicity. Downside: fails to adapt when volatility expands or contracts.
3.2 ATR Multiplier (Adaptive)
ATR bricks adapt to volatility by using the Average True Range (ATR) as the base for brick size. A practical starting point is ATR(14) × 1.0 to 1.5 on your chosen timeframe. Example:
Brick Size = ATR(14) × 1.2Benefits: flexes with market conditions, keeps roughly the same number of bricks on screen over time. Try ATR × 1 on slow markets and ATR × 1.5 on volatile ones.
Resource: ATR based Renko brick size guide
Watch the video and use the Free Renko Brick Size Calculator in Google Sheets to generate and test brick sizes for your own Renko strategies.
3.3 “Walk-Forward” Backtest (Hybrid)
Start with ATR × 1.2, then run a quick backtest in TradingView. Increment brick size ±10 % until net profit / max drawdown looks reasonable and the equity curve is smooth. Lock that value, but re test monthly or after major volatility spikes (for example Fed decisions or crypto crashes).
4. Step-by-Step Guide: How to Build a Renko Chart and Add RSI or MACD
- Open your chart (AAPL in this example).
- Click the chart-type dropdown (top toolbar) and select Renko.
- Choose Traditional or ATR bricks.
(Tip: ATR bricks auto update brick size; Traditional uses a fixed value.) - Set your brick size (for example 1 ATR).
- Click ⚙️ Settings and enable Wick if you want shadows, or keep it disabled for a cleaner look.
- Add indicators such as Supertrend, 200 EMA, or RSI to confirm breakouts.
Video walkthrough: For more indicator ideas and settings, see 5 Dynamic Renko Chart Indicators for Supercharged Analysis and then watch the video below to see how RSI and MACD work on Renko charts.
5. Case Studies: Stock vs Crypto
5.1 Stock
Discover how to use Renko charts with the Supertrend indicator in TradingView to detect early trend reversals and capture longer trends with minimal noise. This Renko trading strategy tutorial features real chart examples with AAPL, MSFT, and WM, showing entry and exit signals, estimated profit targets, and performance results from the TradingView strategy tester. You can combine these ideas with the setups in 5 Renko chart day trading strategies to build your own intraday playbook.
5.2 Crypto – BTCUSD Daily
I asked ChatGPT o3 to analyze Renko charts for the S&P 500, TGT, BTC, and TSLA. In this video, I test its ability to interpret Renko trends and deliver actionable trading insights. Watch how it reads Renko bricks on BTCUSD, then compare those ideas with the rules based approach in Backtesting Renko Chart Strategies so you can see what holds up in hard numbers.
6. Renko vs Candlestick Charts: When to Use Each One

Switching from candlesticks to Renko is not just a cosmetic change. It shifts how you interpret price action. The table below highlights when each view shines.
| Renko Charts | Candlestick Charts |
|---|---|
| Filters intraday noise Only prints a brick when price moves the set amount. | Plots every time interval—even dull ones—so congestion looks messy. |
| Smoother trendlines and support or resistance levels Bricks align like Lego blocks. | Wicks poke through levels; trendlines often need wider buffers. |
| No time axis Keeps focus on pure price movement. | Time axis helps time-based strategies such as opening range or session close. |
| Can be late on explosive breakouts because it needs full brick confirmation. | Captures breakouts faster, but with more false moves and whipsaws. |
| Favoured by swing and trend traders; pairs well with Supertrend, EMA, Ichimoku. | Favoured by day traders and scalpers; integrates volume, wicks, and session opens. |
Key takeaway: Use Renko when you want a cleaner, trend focused view, and flip back to candlesticks to fine tune entries around news bars or volume spikes.
7. Common Mistakes Beginners Make
By mastering these Renko chart basics you will avoid the most common rookie errors and keep your trading rules clear.
- Brick size too small → chart looks like candlesticks; signals fire every few minutes.
- Trading against the higher timeframe trend – always zoom out one timeframe.
- Ignoring basic risk management – Renko cleans up the view, not probability.
- Over indicator syndrome – stick to one or two confirmation tools such as EMA 200 and Supertrend.
- Forgetting to adjust brick size after volatility shifts such as earnings, NFP, or a crypto halving.
If you want to go deeper on these issues, read Top 5 Renko chart mistakes to avoid and four trading psychology lessons from real Renko trades. They pair well with the Renko chart basics you have just learned.
8. FAQs
What timeframe works best for Renko?
Daily or four hour charts often suit swing traders, while five minute Renko charts are popular among scalpers and day traders. The right choice depends on your holding period and the volatility of the market you are trading. If you want a deeper explanation with examples for scalping, day trading, and swing trading, see my guide on the best timeframe for Renko charts.
Can I use Renko charts on crypto?
Yes. Because crypto is volatile, start with ATR bricks so the chart adapts automatically. A brick size around one times ATR(14) on the daily often balances noise and signal.
How often should I adjust the brick size?
Check ATR values monthly, or whenever market volatility visibly changes, such as Fed meetings, major earnings, or geopolitical events. A change of around ten to twenty percent in ATR is a good trigger.
Do Renko charts show gaps?
No. Renko only plots bricks after the price has moved by the specified amount, so overnight gaps appear as a series of bricks rather than single jump candles.
Does Renko work with volume based strategies?
Yes, but volume is not shown natively on Renko, so overlay a separate volume pane or use indicators such as On Balance Volume (OBV) for confirmation.
How do I backtest a Renko strategy in TradingView?
Open the Strategy Tester, set the chart type to Renko, and choose the same brick size you plan to trade live. Remember to switch the Tester to Every Tick for more accurate intra brick fills. For a full walkthrough with tips and examples, see Backtesting Renko Chart Strategies.
9. Next Steps
- 📈 Renko Buy and Sell Signals Guide → Read now
- 🧮 ATR Brick Size Calculator → Use the sheet
- 🖥️ Thinkorswim Renko Setup Tutorial → Watch and read
- 🚀 Advanced Renko Strategies → Level up
- ▶️ Renko tutorials on YouTube → Renko Trading Channel
