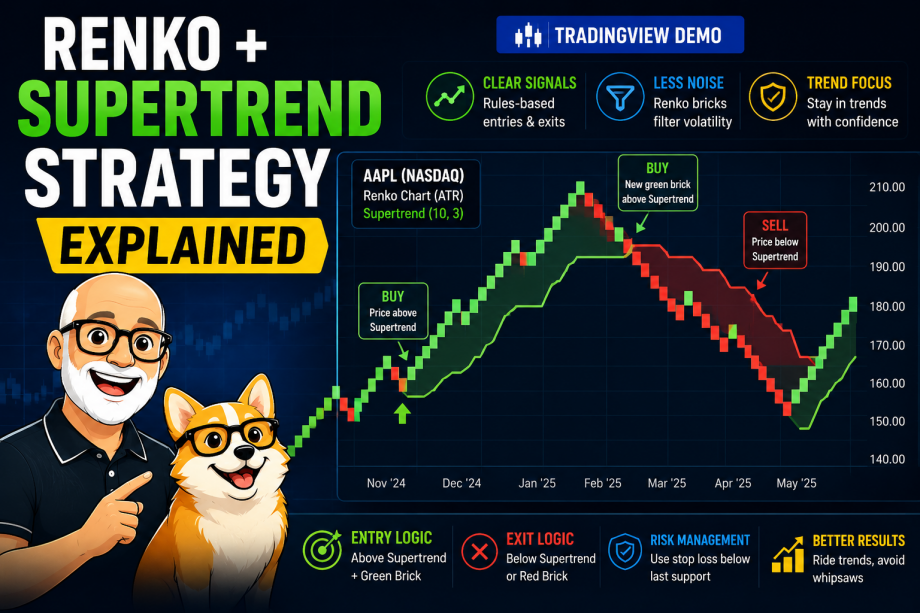
Renko charts and the Supertrend indicator can work surprisingly well together. Renko helps filter out many of the smaller price movements that can make traditional candlestick charts difficult to read, while Supertrend gives us a simple way to visualize trend direction and potential changes in momentum.
In this experiment, I’ll show you how I use a Renko Supertrend strategy in TradingView, including the settings I start with, how I look for entry and exit signals, and what happens when I apply the same basic approach to stocks such as Apple (AAPL), Microsoft (MSFT), and Waste Management (WM).
The goal is not to find a magical Supertrend setting that works everywhere. Instead, I want a simple set of rules that we can test, adjust, and compare across different stocks, Renko brick sizes, and market conditions.
Important: This is an educational strategy experiment and not financial advice. Renko settings, indicator parameters, market conditions, and execution assumptions can all have a major effect on results.
Quick Renko Supertrend Setup
If you want a simple starting point before getting into the details, this is the baseline configuration I use for the experiment:
| Setting | Starting Point |
|---|---|
| Chart type | Renko |
| Supertrend ATR period | 10 |
| Supertrend multiplier | 3 |
| Renko brick method | Fixed size for controlled comparisons |
| Long signal idea | Bullish Supertrend plus Renko confirmation |
| Short signal idea | Bearish Supertrend plus Renko confirmation |
| Exit idea | Supertrend reversal or opposing Renko structure |
| Best environment to test | Sustained trending markets |
| More difficult environment | Sideways and choppy markets |
Think of these as starting settings for experimentation, not the best settings for every stock or market.
Renko + Supertrend TradingView Video Walkthrough
The video below walks through the setup in TradingView and shows how the same Renko + Supertrend idea behaves across AAPL, MSFT, and WM.
What Is a Renko Supertrend Strategy?
A Renko Supertrend strategy combines two different ways of simplifying price action.
- Renko charts focus on price movement rather than printing a new candle simply because a certain amount of time has passed.
- Supertrend uses ATR-based calculations to plot a trend-following line above or below price.
When Supertrend turns bullish, the line generally moves below price. When the trend changes to bearish, the line moves above price. On a Renko chart, that directional change can be easier to evaluate because much of the smaller price movement has already been filtered by the brick size.
The idea is simple: instead of acting on every Supertrend change immediately, I can use the Renko structure as an additional confirmation layer.
If you want to experiment with additional trend, momentum, or confirmation tools, see my guide to the best indicators for Renko charts in TradingView.
What Supertrend Settings Should You Use With Renko?
For this experiment, I start with the common Supertrend configuration of:
- ATR Period: 10
- Multiplier: 3
I don’t consider 10 and 3 to be universally “best.” They simply provide a useful baseline that makes it easier to compare what happens when one variable changes.
ATR Period
The ATR period controls how much historical volatility is included in the Supertrend calculation. A shorter period generally makes the indicator more responsive, while a longer period tends to smooth the response.
Rather than immediately changing several settings at once, I prefer to start with 10 and then test alternatives while keeping everything else unchanged.
Supertrend Multiplier
The multiplier determines how far the Supertrend band sits from price.
- Multiplier of 2: More sensitive and potentially earlier signals, but also more reversals.
- Multiplier of 3: My baseline starting point for this experiment.
- Multiplier of 4: Gives price more room before the trend changes, which may reduce some false reversals but can also create later exits.
This tradeoff is important. Making Supertrend more sensitive does not automatically make the strategy better. Earlier entries can also mean more false signals.
Renko Brick Size
The Renko brick size can have just as much influence on the strategy as the Supertrend settings.
A smaller brick size reacts to smaller price changes and will usually produce more bricks and more potential signals. A larger brick size filters more price movement but can delay entries and exits.
For controlled historical comparisons, I often prefer a fixed brick size because the brick-size parameter stays constant throughout the test. ATR-based Renko brick sizes adjust with volatility, which can make comparisons between different market periods more complicated.
If you’re deciding between ATR and fixed brick sizing, see my detailed guide to ATR-based Renko brick-size calculation.
How to Set Up Renko + Supertrend in TradingView
Here’s the basic process I use to build the chart:
- Open the stock, ETF, index, forex pair, or other market you want to study in TradingView.
- Change the chart type to Renko.
- Choose the Renko brick calculation method and brick size you want to test.
- Add the Supertrend indicator to the chart.
- Start with an ATR period of 10 and multiplier of 3.
- Look at how often Supertrend changes direction relative to the Renko brick reversals.
- Adjust one setting at a time and compare the results.
That last step matters. If you change the ATR period, multiplier, brick size, and entry rules simultaneously, it becomes difficult to know which change actually improved or hurt the strategy.
Renko Supertrend Entry and Exit Signals
The advantage of combining Renko with Supertrend is that you can build very visual rules. The following rules are examples of how I might structure the experiment.
Example Long Entry
For a potential long setup, I look for two pieces of information:
- Supertrend changes to a bullish state with the line below price.
- A bullish Renko brick confirms the move.
The purpose of the confirmation brick is to avoid treating every small change in the indicator as an automatic trade.
Example Short Entry
The short setup reverses the logic:
- Supertrend changes to a bearish state with the line above price.
- A bearish Renko brick confirms the downside move.
Whether short selling is appropriate depends on the market, account, instrument, and risk rules being used. For strategy testing, the important point is to keep the entry logic consistent.
Example Exit Signal
An exit can be based on a Supertrend reversal, opposing Renko structure, or a combination of the two.
For example, a long position could be closed after a completed Renko brick confirms a move back through the Supertrend line. Another version might exit as soon as Supertrend changes direction.
These rules produce different results. Waiting for additional confirmation can reduce some premature exits, but it also means giving back more of an existing move before the position closes.
What About Stop Losses and Risk Management?
Supertrend is often used as a visual trailing trend line, but I would not assume the indicator alone provides complete risk management.
Depending on the experiment, a separate stop could be based on the most recent structural swing, a fixed amount, a percentage of price, volatility, or another predefined risk rule.
The important part of a backtest is deciding on the rule before evaluating the results. Changing the stop after seeing which trades won or lost can make a strategy look much better historically than it might behave going forward.
Renko Supertrend Examples: AAPL, MSFT, and WM
One reason I like testing the same setup on several stocks is that it quickly shows whether the strategy depends on a particular type of price behavior.
Apple (AAPL)
AAPL is a useful example because it can produce extended directional moves but also experiences plenty of shorter reversals and consolidations along the way.
During a strong trend, Renko can make the overall direction visually much easier to follow. Supertrend then provides a second reference for deciding whether the existing trend structure remains intact.
The challenge appears when AAPL moves sideways. Smaller brick sizes or more sensitive Supertrend settings can create repeated changes in direction, which is exactly the type of behavior this experiment needs to account for.
Microsoft (MSFT)
MSFT provides another high-liquidity stock for comparing the setup. Its price range and volatility can differ significantly from AAPL, which makes using the exact same fixed brick size across both stocks an interesting test but not necessarily the most appropriate final configuration.
This is where brick-size selection becomes important. A setting that produces clear signals on one stock can be far too sensitive or too slow on another.
Waste Management (WM)
WM gives the experiment a different type of stock to examine. Compared with faster-moving technology stocks, its trends may develop differently and can reveal whether the Supertrend parameters need to be adjusted for slower price movement.
This is one of the reasons I prefer testing strategy ideas across several symbols instead of presenting the result from one carefully selected chart as proof that a setup works everywhere.
When Does Renko + Supertrend Work Best?
The Renko Supertrend combination is fundamentally a trend-following idea. That means the most favorable environment to test is one where price develops sustained directional moves.
- Strong trends: Renko can filter smaller pullbacks while Supertrend remains aligned with the larger move.
- Breakouts that continue: The combination can provide a simple visual framework for staying with the new direction.
- Orderly pullbacks: A properly selected brick size may help prevent every minor retracement from looking like a major trend change.
That does not mean every trend will be profitable. The settings still determine how quickly the strategy enters and how much of a reversal it allows before exiting.
Renko Supertrend Strategy Limitations
No trend-following indicator combination eliminates false signals. Renko + Supertrend has several limitations that are worth understanding before looking at any backtest results.
- Sideways markets can create whipsaws. When price repeatedly changes direction without developing a sustained trend, both Renko reversals and Supertrend changes can generate losing signals.
- Brick size changes the strategy. A different Renko brick size can completely change the number and timing of signals.
- Supertrend parameters matter. A multiplier of 2 can behave very differently from a multiplier of 4.
- Later confirmation has a cost. Waiting for additional Renko confirmation may filter some false signals, but it can also delay entries and exits.
- Historical Renko testing requires care. Renko charts are constructed differently from standard time-based candles, so results should be interpreted with the chart construction and execution assumptions in mind.
- One stock does not prove a strategy. A setup that looks excellent on AAPL during a strong trend may behave very differently on another stock or during another market regime.
How I Would Backtest Renko + Supertrend
If I wanted to move this experiment beyond visual chart inspection, I would first turn the idea into specific mechanical rules.
- Choose the symbol and testing period.
- Choose a fixed Renko brick size.
- Set the Supertrend ATR period and multiplier.
- Define exactly what creates an entry.
- Define exactly what creates an exit.
- Define any stop-loss or risk rule.
- Run the same rules without changing them halfway through the test.
- Compare the strategy with a simple benchmark.
- Repeat the experiment using different symbols and market environments.
Then I would change one variable at a time. For example, I might compare Supertrend multipliers of 2, 3, and 4 while leaving the Renko brick size and every other rule unchanged.
For another example of how I approach testing Renko signals, see Smarter Renko Breakout Entries & Exits: AAPL Backtest.
Ways to Experiment With the Strategy
Once the baseline version is working, there are plenty of ways to extend the experiment without making the original rules unnecessarily complicated.
- Compare fixed Renko brick sizes.
- Compare ATR-based and fixed-size Renko.
- Test Supertrend multipliers of 2, 3, and 4.
- Require one additional Renko confirmation brick before entry.
- Add a moving average as a larger trend filter.
- Test long-only versus long-and-short versions.
- Compare technology stocks with lower-volatility stocks.
- Measure maximum drawdown, not just total return.
- Compare results against buy-and-hold over the same period.
If you want more ideas, my advanced Renko chart strategies article explores additional ways of combining Renko price structure with indicators and trend-following rules.
Can AI Optimize Renko Supertrend Settings?
AI and automated testing tools can certainly help compare large numbers of parameter combinations, such as different brick sizes, ATR periods, and Supertrend multipliers. What they cannot do is magically produce one setting that will remain optimal across every stock and every market environment.
The more interesting use of AI is helping us organize experiments, identify patterns in the results, and test whether an apparent improvement survives outside the original sample.
I explore that topic further in The Future of AI and Renko Charts.
Renko Supertrend Strategy: Key Takeaways
- Renko and Supertrend complement each other: Renko simplifies price structure while Supertrend provides a visual trend-following signal.
- 10 and 3 are starting settings: An ATR period of 10 and multiplier of 3 are useful baselines, not universal optimum settings.
- Brick size matters: Changing the Renko brick size can have a major effect on signal frequency and strategy behavior.
- Confirmation is a tradeoff: Waiting for a Renko brick to confirm a Supertrend change may reduce some false signals but can also create later entries and exits.
- Trending markets are easier: Sideways price action remains one of the biggest challenges for this type of strategy.
- Test across multiple stocks: AAPL, MSFT, and WM help illustrate how the same settings can behave differently across different price characteristics.
- Backtesting matters: Treat the strategy as an idea to test rather than assuming a visually attractive chart automatically represents a profitable system.
Renko Supertrend FAQ
Does Supertrend Work With Renko Charts?
Yes. Supertrend can be applied to Renko charts just like other technical indicators. The combination can be useful for experimentation because Renko simplifies price movement while Supertrend provides a clear visual indication of trend direction. The results still depend heavily on brick size, Supertrend settings, and market conditions.
What Are the Best Supertrend Settings for Renko Charts?
There is no single best setting for every Renko chart. I use an ATR period of 10 and multiplier of 3 as a baseline. From there, I test different values while keeping the other strategy rules unchanged so I can see whether the adjustment actually improves the results.
What Supertrend Multiplier Should I Use With Renko?
A multiplier of 3 is a reasonable starting point for experimentation. A multiplier of 2 generally reacts more quickly and may create more signals, while a multiplier of 4 gives price more room before Supertrend reverses. Each choice involves a tradeoff between responsiveness and filtering.
Should I Use Fixed or ATR Renko Bricks With Supertrend?
Both can be tested. For controlled historical comparisons, I often prefer fixed-size bricks because the brick-size parameter remains constant throughout the experiment. ATR-based Renko adjusts brick size according to volatility, which can be useful for chart analysis but adds another changing variable to a historical comparison.
Is Renko + Supertrend Good for Sideways Markets?
Sideways markets are usually more difficult for a trend-following setup. Price can repeatedly reverse direction without developing a sustained trend, causing Supertrend and Renko confirmation signals to alternate more frequently. This is one reason market regime and brick-size selection should be part of the testing process.
How Do I Use Renko and Supertrend in TradingView?
Open a chart in TradingView, switch the chart type to Renko, choose your brick settings, and add the Supertrend indicator. I start with an ATR period of 10 and multiplier of 3 and then look for Renko bricks to confirm changes in Supertrend direction.
Final Thoughts
I like the Renko + Supertrend combination because it gives me a simple framework for testing trend-following ideas without filling the chart with indicators.
But the interesting part isn’t finding a chart where the strategy looks perfect. The interesting part is changing the brick size, adjusting the Supertrend parameters, testing different stocks, and seeing where the idea succeeds or fails.
That’s the approach I use throughout the Renko Trading Channel: start with an idea, define the rules, test it, and learn from the results.
If you’d like to see more of my Renko experiments, TradingView backtests, and strategy ideas, subscribe to the Renko Trading Channel on YouTube. I regularly test different settings and share what I learn, including setups that don’t behave as expected.
All strategies and settings discussed here are educational ideas for experimentation. They are not financial advice or recommendations to buy or sell any security.