Updated: August 23, 2025 — Clear rules for recognizing and trading five core Renko patterns, with entries, stops, targets, and mistakes to avoid.
Renko charts filter out small price noise by printing fixed-size “bricks” only after sufficient movement. That makes structure cleaner and pattern recognition more objective. Below you’ll find five proven Renko patterns and exactly how to trade them with confirm-brick rules.
Before you trade Renko chart patterns, tune your brick size with the ATR Renko brick size guide and lock your triggers with the Renko buy & sell signal checklist.
If you want to see how I apply Renko patterns and trend structure in real long-term investing decisions, take a look at my Renko Investing Strategy – How I Use Renko Charts for Long-Term Decisions.
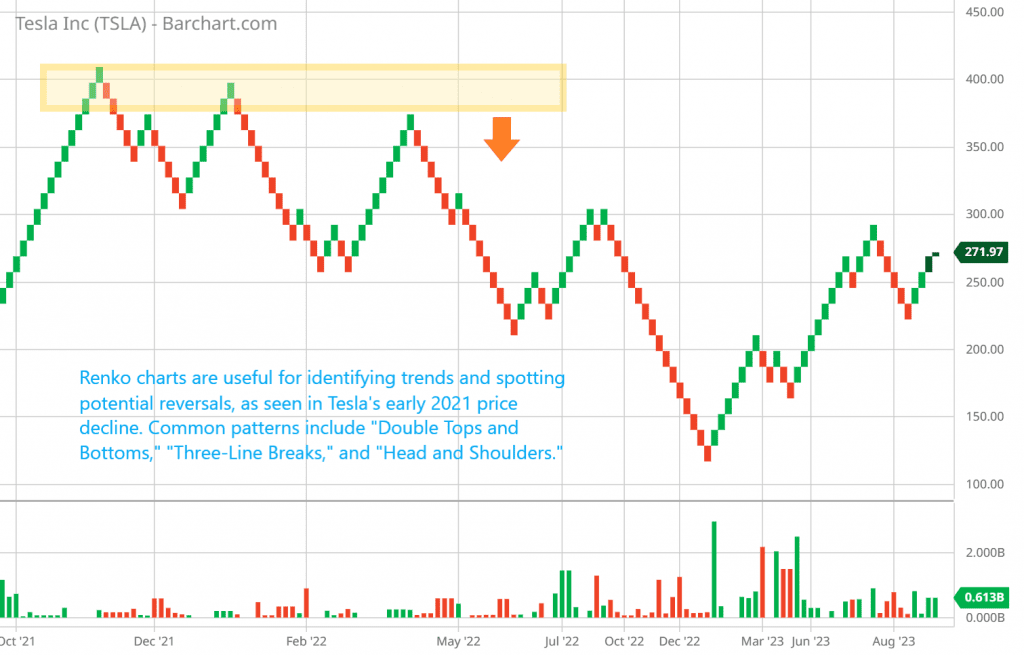
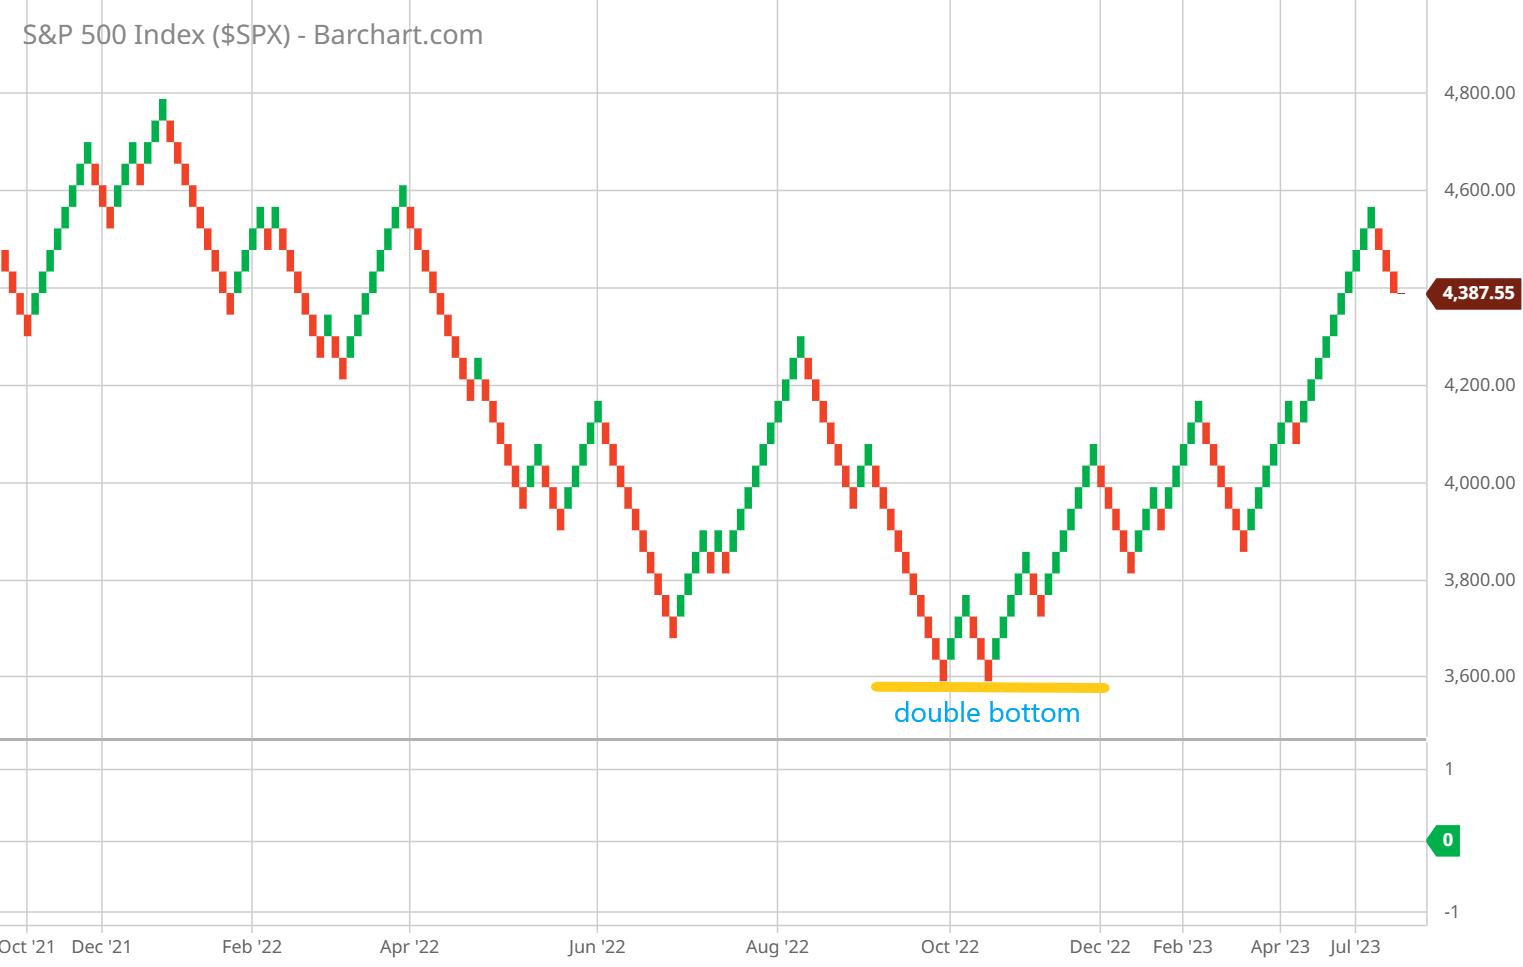
- Double Top/Bottom — Reversal. Entry: Neckline break + confirm brick. Invalidation: Close back across neckline. Target: Pattern height.
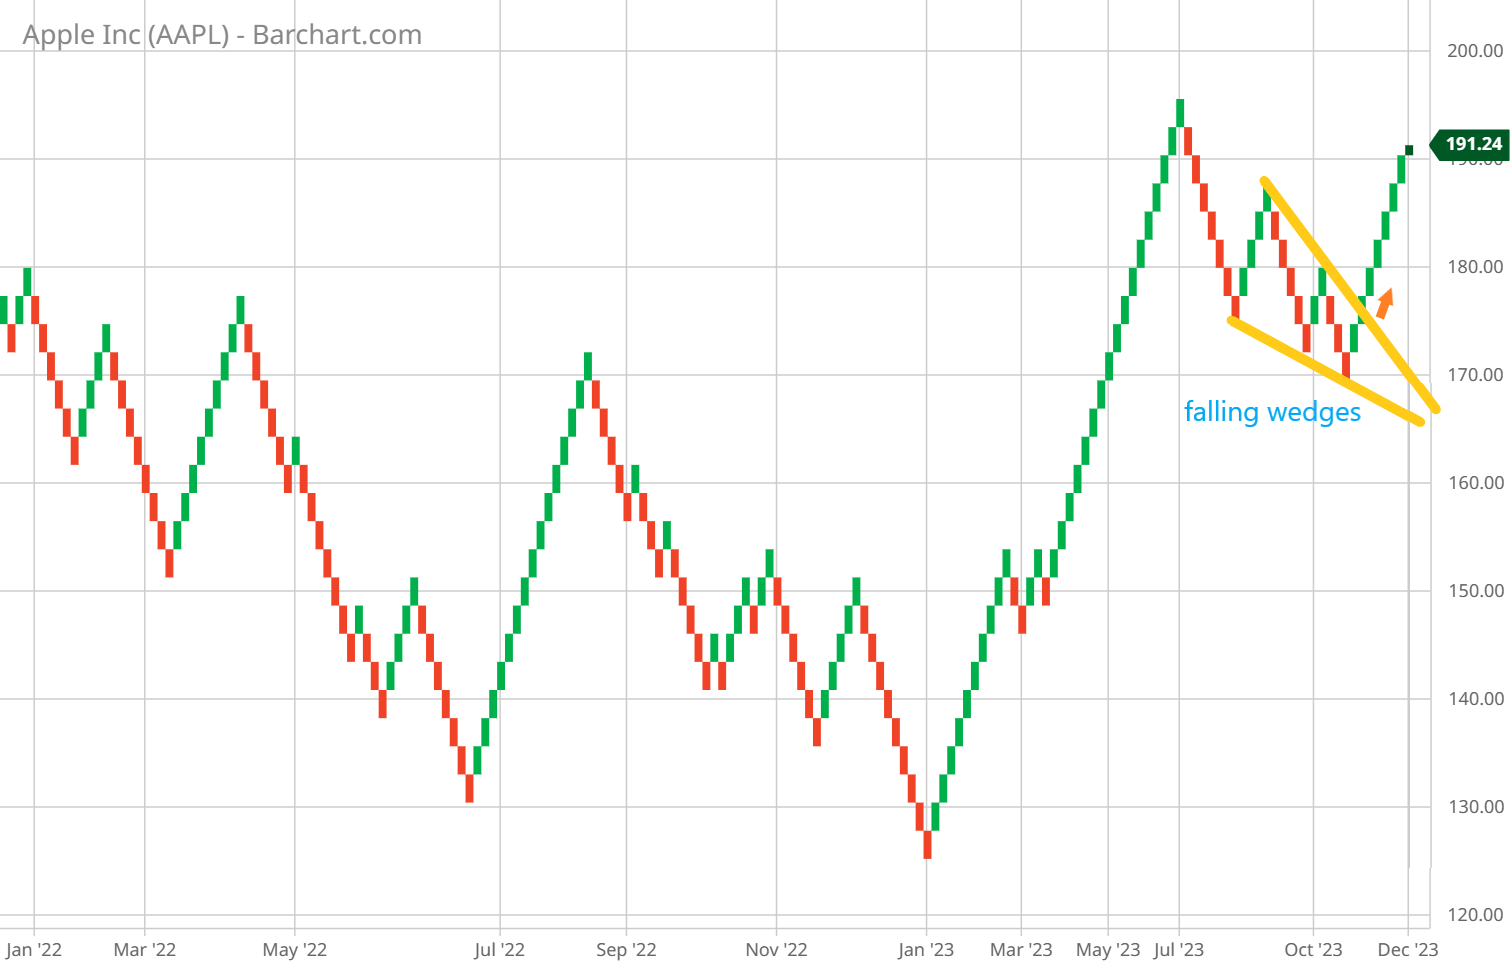
- Wedges — Falling = bullish, Rising = bearish. Trade the confirmed break of the wedge boundary; optional momentum/volume confirm.
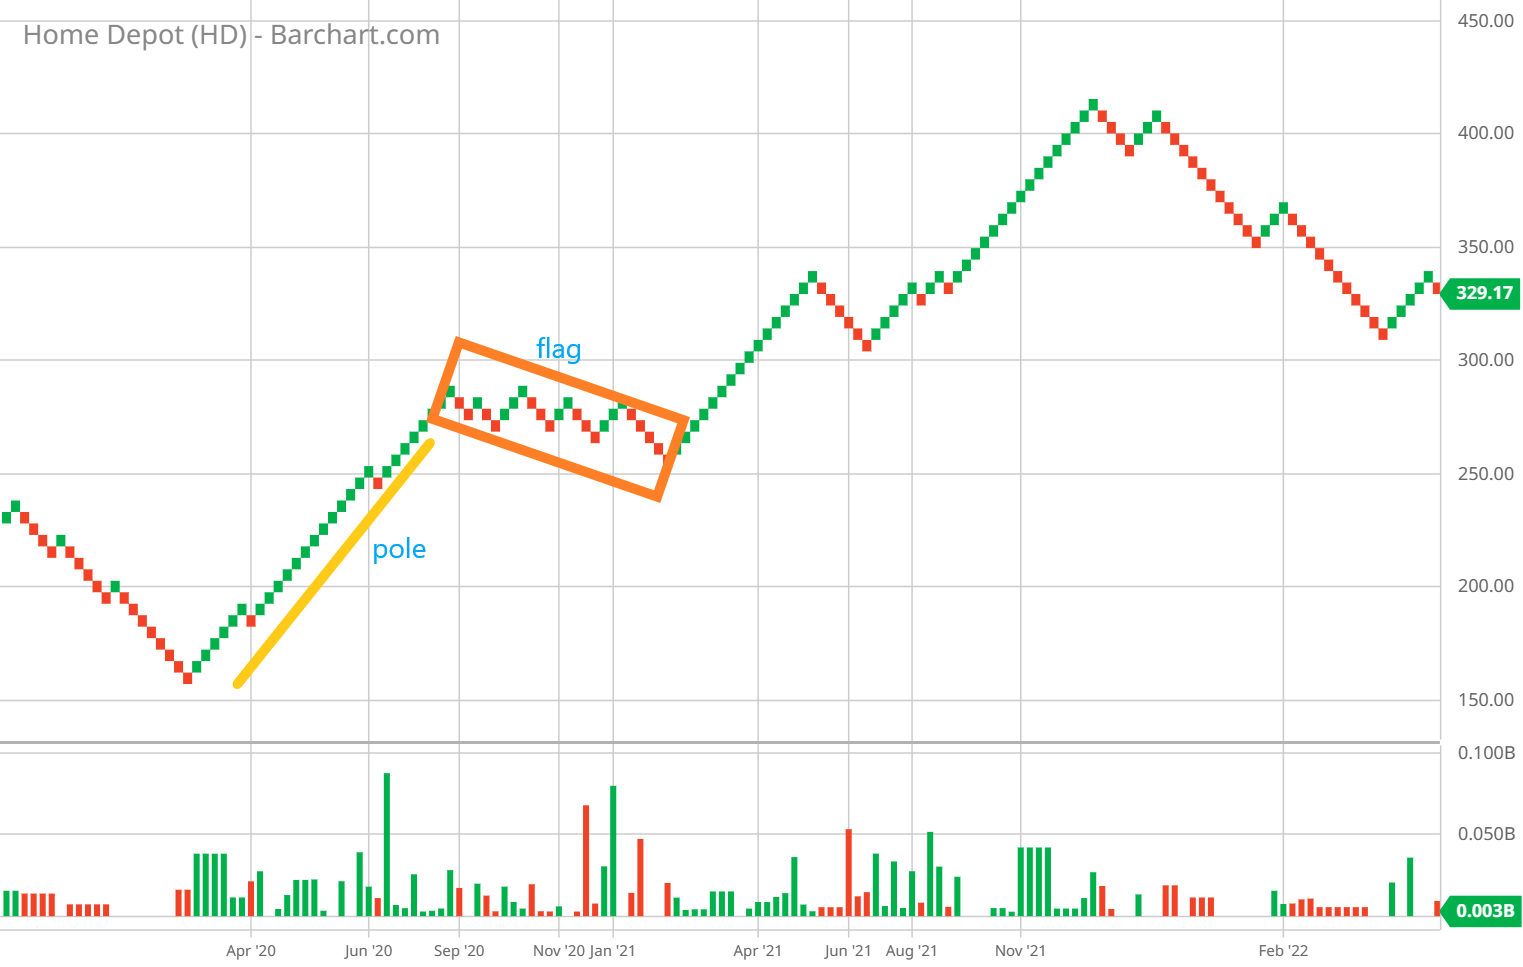
- Flags — Continuation. Break of the channel in the direction of the pole; invalidation = back inside flag.
- Head & Shoulders — Reversal. Neckline break + confirm brick; stop beyond right shoulder.
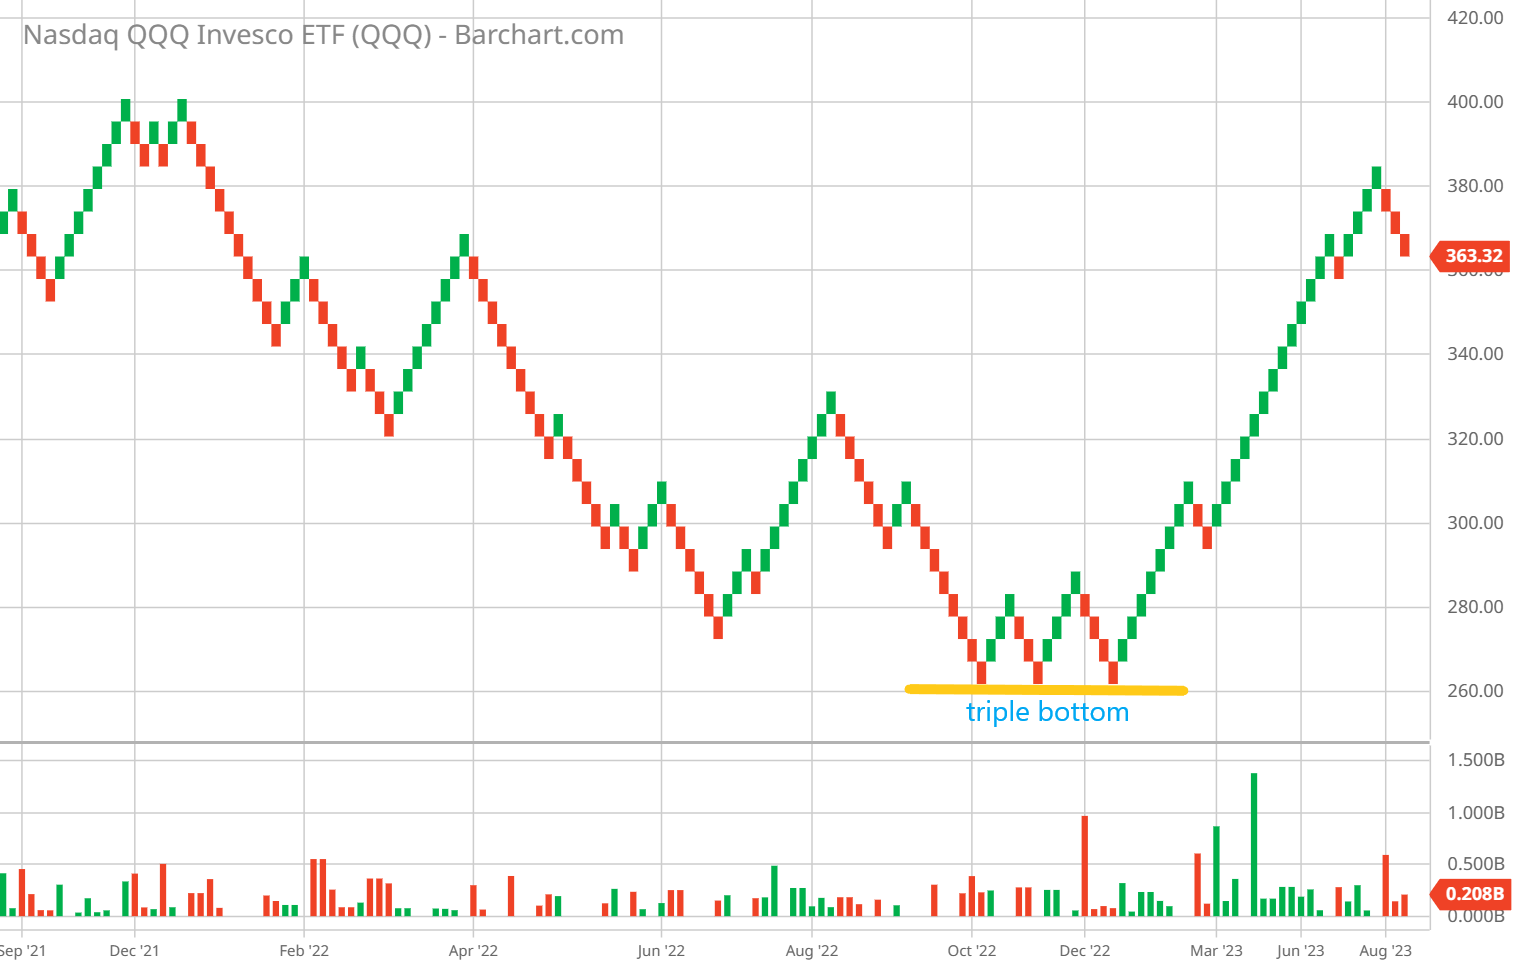
- Triple Top/Bottom — Reversal after 3 tests; entry on range break; target = range height.
Renko Chart Patterns Comparison Table
| Pattern | Type | Recognition | Entry Trigger | Invalidation |
|---|---|---|---|---|
| Double Top / Bottom | Reversal | Two similar highs/lows with a clear neckline | Close beyond neckline with a confirm brick | Close back across neckline |
| Falling Wedge | Bullish (reversal/continuation) | Lower highs & lows; converging lines sloping down | Breakout above upper line + confirm brick | Close back inside wedge |
| Rising Wedge | Bearish (reversal/continuation) | Higher highs & lows; converging lines sloping up | Breakdown below lower line + confirm brick | Close back inside wedge |
| Bullish / Bearish Flag | Continuation | Strong pole, then tight channel against the move | Break of channel in direction of pole | Close back into channel |
| Triple Top / Bottom | Reversal | Three similar highs/lows (well-defined range) | Range break with confirm brick | Re-entry into range |
Double Top / Double Bottom
What it is: A classic two-swing reversal with a neckline in the middle.
- Recognize it: Two similar highs (double top) or lows (double bottom) with a clear mid-level.
- Entry: Wait for a close beyond the neckline; enter on the first confirm brick in that direction.
- Stops: 1–2 bricks beyond invalidation (back across the neckline).
- Targets: Height of the pattern projected from the neckline break; trail 1–2 bricks once in profit.
- Mistakes to avoid: Entering inside the range; ignoring nearby major S/R.
Wedges (Falling & Rising)
Key point: Falling wedges tend to be bullish; rising wedges tend to be bearish. Confirm the break with a close outside the wedge.
- Recognize it: Converging swings; falling wedge slopes down, rising wedge slopes up.
- Entry: Trade the breakout: close beyond the boundary + confirm brick.
- Stops: 1–2 bricks back inside the wedge.
- Targets: Conservative = last swing; measured = wedge height from the break.
- Optional confirm: Momentum shift (MACD/RSI) or increasing volume.
Bullish / Bearish Flags
What it is: A brief, tight counter-move (flag) after a strong advance/decline (pole).
- Recognize it: A steep pole followed by a compact channel against the pole.
- Entry: Break of the flag in the direction of the pole; use the first confirm brick.
- Stops: Back inside the flag or beyond the opposite flag line.
- Targets: Pole measured-move; partials at prior swing zones.
- Mistakes to avoid: Trading flags that form after an already extended multi-brick run without a pause.
Head & Shoulders
What it is: A three-swing reversal with a neckline—bearish H&S (tops) or bullish inverse H&S (bottoms).
- Recognize it: Left shoulder → head → right shoulder, with a clear neckline.
- Entry: Neckline break + confirm brick.
- Stops: Beyond the right shoulder.
- Targets: Distance from head to neckline projected from the break; trail once initial target is reached.
- Mistakes to avoid: Entering before a real break; ignoring sloped necklines that move invalidation.
Triple Top / Triple Bottom
What it is: A range with three similar highs or lows where the third test fails and the range breaks.
- Recognize it: 3 tests of the same zone (tops or bottoms) with a clean range.
- Entry: Close beyond the range boundary + confirm brick.
- Stops: Back inside the range.
- Targets: Range height projected from the break; consider partials at intermediate levels.
- Mistakes to avoid: Trading before 3 clear tests; chasing after an extended breakout sequence.
Trading Renko Patterns with Confirmation Signals
Renko patterns like M, W, and Head & Shoulders become more reliable when paired with confirmation tools such as volume spikes or moving average crosses. For example, a W-pattern backed by a bullish volume surge signals strong reversal potential. Always look for confirmation before entering; it helps filter out false starts. Adding a brief note or screenshot improves clarity for readers reviewing examples.
Understanding confirmation techniques enhances pattern accuracy. Understand brick-size calculation.
FAQs
How reliable are Renko chart patterns?
Which Renko pattern gives the earliest signal?
Are Renko wedges bullish or bearish?
What’s a good Renko entry confirmation?
Where should I place stops?
Do Renko patterns work on all assets?
Patterns are powerful — but even the best setups can fail without proper discipline. Want to learn why technical analysis without discipline often leads to bad trades? Watch my video on why technical analysis fails without discipline to hear the real trading mistakes that reshaped how I trade.
Further Reading
- ATR Renko Brick Size: Step-by-Step
- Renko Buy & Sell Signals: Patterns & Examples
- Best Renko Indicators: Full List & Examples
- Renko Trend Trading: 5 Proven Tips
Thinkorswim user? Get Renko configured correctly first with our Thinkorswim Renko setup, then trade the patterns in this guide.
Let’s Connect
- Subscribe to the Renko Trading Channel for weekly updates.
Education only, not financial advice. Test any approach on your own instruments, brick sizes, and timeframes.
