Swing trading can feel overwhelming when markets are noisy and unpredictable — but it doesn’t have to be. Renko charts strip away the clutter, giving traders a clearer view of real price trends. In this guide, you’ll discover five powerful Renko swing trading strategies designed to help you spot opportunities with greater confidence and consistency.
Who Should Use These Strategies?
If you’re tired of second-guessing every price move on noisy candlestick charts, you’re in the right place. Renko swing trading strategies are built for traders who want less noise, clearer trends, and stronger setups. Whether you’re just getting started or you’re a seasoned swing trader ready to level up, these strategies will help you spot winning trades faster and stay confident longer. Ready to trade smarter — not harder? Let’s dive in.
Quick Visual Guide: Want a fast, clear overview before diving deep into the strategies? Watch this short video where I walk you through real Renko chart setups, highlight key entry points, and show you how to swing trade smarter with less noise. It’s the perfect jumpstart before you dive into the details below!
Table of Contents
5 Best Renko Swing Trading Strategies
1. Trend Reversal Strategy
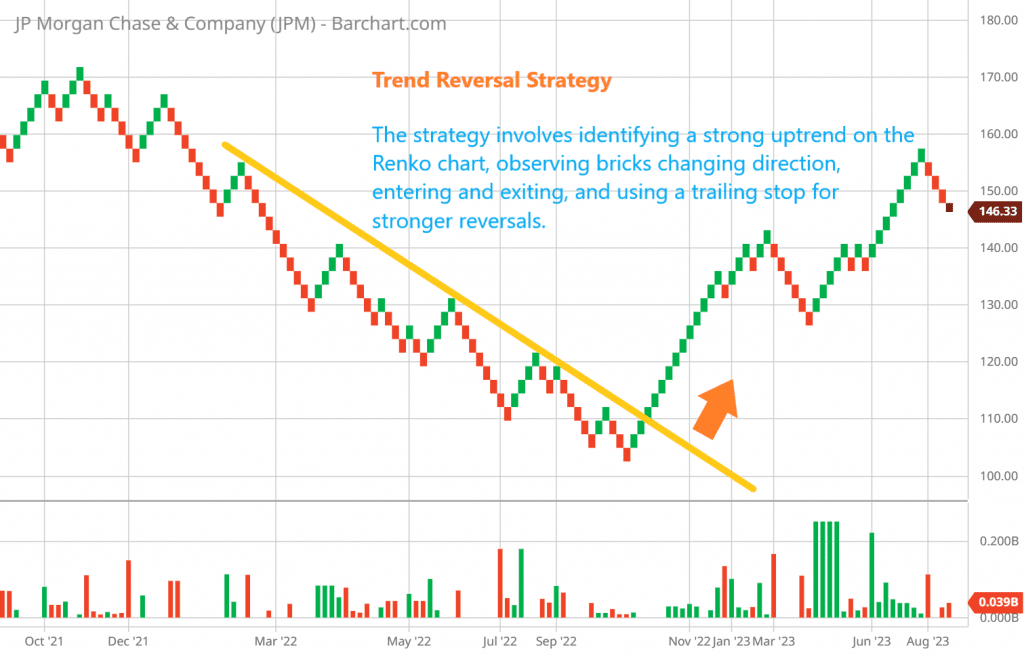
When using Renko swing trading strategies, drawing effective trendlines can help confirm entries and exits.
- Setup: Identify a strong uptrend on the Renko chart. Look for a series of bricks changing direction and slowing down.
- Entry: Once a series of reversal bricks forms, wait for a confirming brick to close in the new direction.
- Exit: Set an exit target at a key support level identified on the Renko chart. For a stronger reversal, use a trailing stop.
Example: Suppose you’re observing an uptrend in a stock’s Renko chart. As bricks start to change direction and slow down, you wait for a series of bricks forming in the opposite direction. Once this series is confirmed by a closing brick, you enter a short trade. For the exit, you identify a significant support level on the Renko chart, where you set your target. Alternatively, you can use a trailing stop to capture additional gains if the reversal gathers momentum.

2. Breakout Strategy
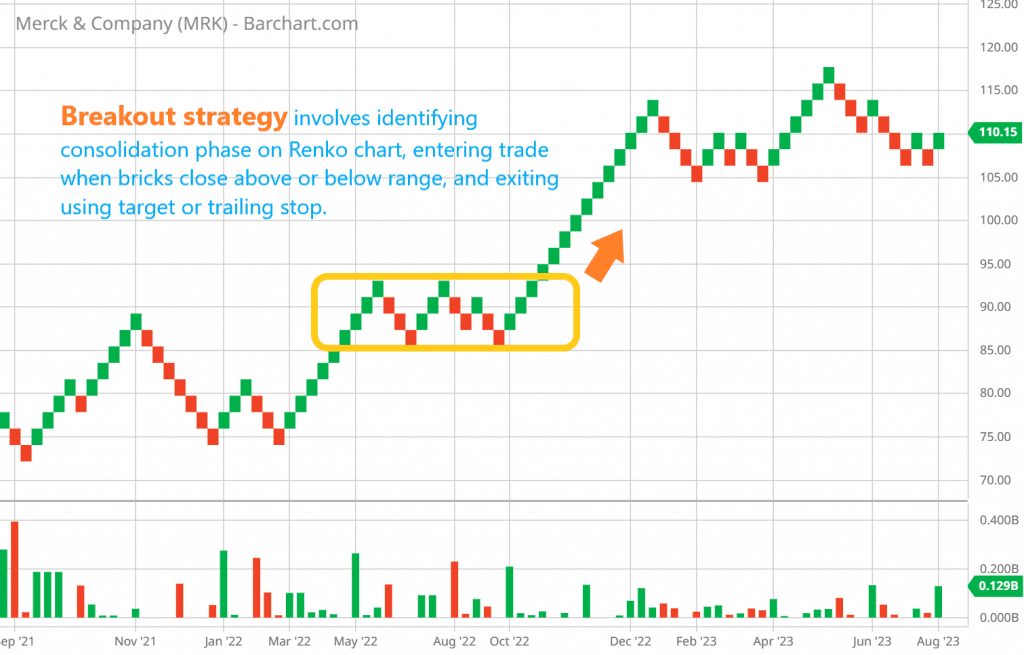
- Setup: Identify a consolidation phase on the Renko chart where bricks form within a tight range.
- Entry: When a brick closes above or below the consolidation range, consider entering a trade in the breakout direction.
- Exit: Use the consolidation range’s height to set a target or employ a trailing stop to ride the trend.
Example: Imagine a stock that has been consolidating on the Renko chart. As bricks form within a narrow range, you wait for a breakout. Once a brick closes above the upper boundary of the consolidation range, you enter a long trade. To set your target, you calculate the height of the consolidation range and project it upwards. Alternatively, you can use a trailing stop to capture more gains as the trend develops.

3. Moving Average Crossovers
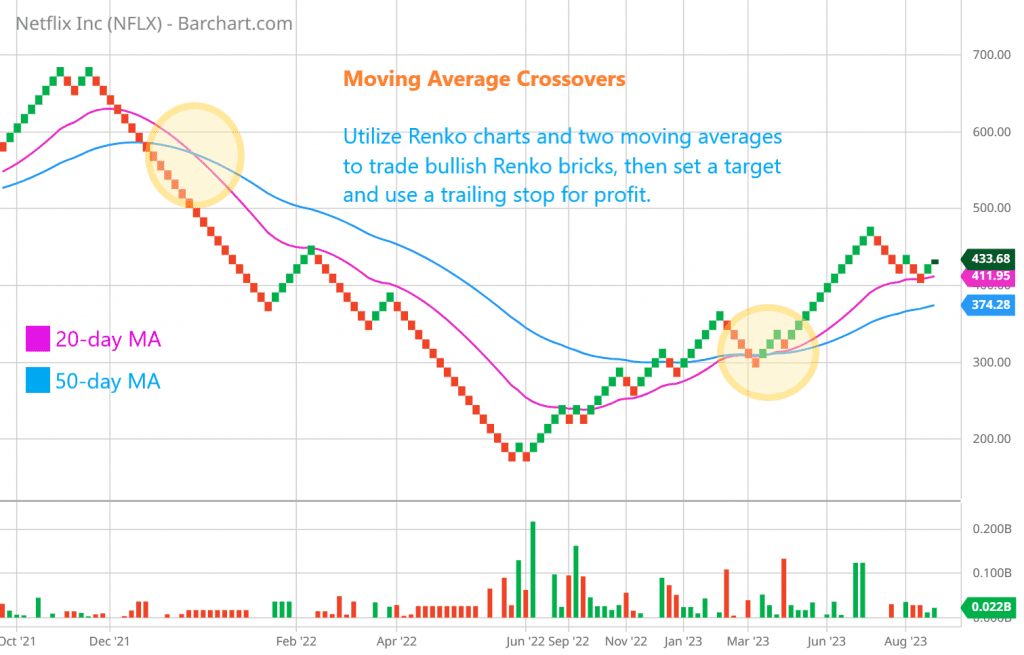
- Setup: Combine Renko charts with two moving averages (e.g., 10-period and 20-period).
- Entry: Wait for a bullish Renko brick to close above the shorter moving average after a bullish crossover.
- Exit: Set a target based on price action or the longer moving average. Utilize a trailing stop to secure profits.
Example: Using a Renko chart alongside a 10-period and a 20-period moving average, you observe a bullish crossover. As a bullish Renko brick closes above the shorter moving average, you enter a long trade. For the exit, you set a target based on the recent swing high or the longer moving average. To protect gains, you also employ a trailing stop that adjusts as the trade progresses.

4. Fibonacci Retracement Strategy
- Setup: Identify a strong trend on the Renko chart and use Fibonacci retracement levels.
- Entry: Wait for a retracement to a key Fibonacci level and a bullish/bearish Renko pattern.
- Exit: Set a target near the recent swing high/low or a Fibonacci extension level. Employ a trailing stop for potential extended gains.
Example: While analyzing a Renko chart of a stock with a strong trend, you notice a retracement to a key Fibonacci level. Simultaneously, a bullish Renko pattern forms, indicating a potential reversal. This prompts you to enter a long trade. To determine your target, you consider the recent swing high and set a target just below it. For additional gains, you use a trailing stop, allowing you to capture profits if the trend extends further.
5. Dual Renko Strategy
- Setup: Use two Renko charts with different brick sizes (e.g., one with larger bricks and one with smaller bricks).
- Entry: Wait for signals to align on both Renko charts, indicating a high-probability trade.
- Exit: Utilize a combination of both Renko charts to set targets and manage stops.
Example: Employing dual Renko charts, one with larger bricks and the other with smaller bricks, you identify a trading opportunity. As a bullish Renko pattern forms on both charts, you see a strong alignment of signals. This high-probability setup prompts you to enter a long trade. To set your target, you consider both Renko charts and select a level that aligns with the larger timeframe chart. For managing the trade, you use the combination of both charts to adjust stops and protect profits.
💡 Quick Summary: Mastering Renko Swing Trading
- ✅ You learned how Renko charts simplify swing trading by filtering out market noise.
- ✅ You explored five effective strategies designed for clearer entries and exits.
- ✅ You discovered who can benefit most from adopting Renko techniques in their trading.
Next Steps:
Ready to refine your skills even further?
Explore advanced Renko chart indicators and level up your swing trading strategy!
FAQs (Frequently Asked Questions)
1. Can Renko charts be used for day trading or longer-term investing?
Renko charts are versatile and can be adapted to various trading styles. They are commonly used for day trading, swing trading, and longer-term investing strategies.
2. Do I need to pay for Renko charting services?
Some trading platforms offer Renko charting as part of their basic features, while others might require a subscription or an additional fee for advanced charting tools.
3. Can I use Renko charts alongside traditional charts?
Yes, many traders use Renko charts in conjunction with traditional candlestick or bar charts to get a more comprehensive view of the market.
4. How often should I adjust my Renko brick size?
The frequency of adjusting brick sizes depends on market conditions and the asset you’re trading. Generally, more volatile assets might require more frequent adjustments.
5. Are Renko charts foolproof for swing trading?
While Renko charts offer clarity, no trading strategy is foolproof. It’s important to combine Renko analysis with other indicators, perform thorough research, and practice effective risk management.
